It is now mandatory for people with old generation driving licenses to apply for the Smart Driving License. They were rolled out in April 2018 by the National Transport and Safety Authority (NTSA). The look and size of the smart driving license are almost like the national ID as opposed to the booklet type of the old generation. This new smart driving license comes with a secure computer chip containing the driver’s information. This data will only be accessed via special electronic gadgets owned and managed by NTSA.
Front and Back Sample of a Smart Driving License
Offenses committed by the DL holder will be recorded and points deducted. Through the point deduction system, it will be easier to penalize the offenders. When fully implemented, what we might see is good drivers being rewarded and the bad ones fined. Repeat offenders will be suspended while others will lose their driving licenses. This will encourage good driving and reduce the rampant road carnage experienced from time to time.
How to Apply for Smart DL
Process of Applying For the Smart
Driving License in Kenya
At the top green bar, locate the driving license link and click on it. Your license details will be automatically populated. If it is the first time you are applying for a driving license, start by going to a registered school for training.
Click on apply for a Smart DL.
Confirm the details populated on the screen. Be sure to input your blood group and your county of residence.
If the captured data is erroneous, do not proceed to make payment. Click on the provided link to make corrections.
If you are satisfied that your personal data is correct, proceed to make payment. The payment is 3,050/=.
After your payment goes through, book the date you will go for the biometrics and photo capture. The green bars indicate an available time and the red ones a booked one. Remember to select an NTSA station near to you.
Attend the appointment and keep time.
Wait for your smart digital license to be printed.
Your Smart DL
And that is the simple process to
follow when applying for the smart driving license. The license is valid for
three years.
Memoryis made from tiny semiconductor chips that are then packaged in a less fragile way to enable them to be integrated into a computer system. The chip packages are more often integrated into larger packages. Computer memory is therefore available in various physical packaging. This article discusses the various memory packaging that has been used in the computer world.
The Major Types of Memory Packaging Include the Following
Single Inline Pin Package (SIPP)
This is an obsolete type of memory module with a single row of (actual) pins along one side. SIPP was made of a printed circuit board where a number of memory chips were mounted. It had 30 protruding pins along one edge which were inserted into matching holes on the motherboard. This memory packaging was used for a while before SIMM technology replaced it.
SIPP-Module: User Smial on de.wikipedia [CC BY-SA 2.0 DE (https://creativecommons.org/licenses/by-sa/2.0/de/deed.en)]
Single
Inline Memory Module (SIMM)
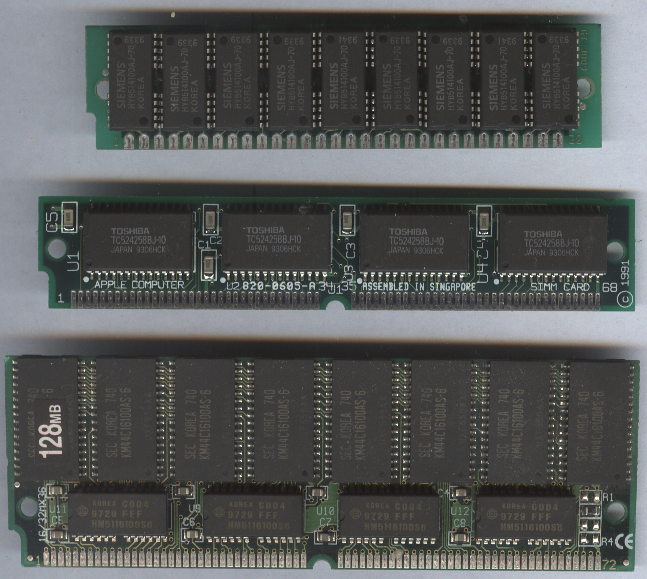
This is a type of memory module containing Random Access Memory and it was used in the early days of the personal computer. Single Inline Memory Module is now an obsolete type of memory stick. It contained power and data contacts on one side of the board. The pins on the other side were redundant. SIMMs comes in two sizes, 30-pin, and 72-pin. The 30-pin SIMMs usually came with small amounts of memory.
The standard size was 256 KB, 1 MB, 4 MB, 8 MB, and 16MB. The 72-pin SIMM came in standard sizes of 1 MB, 2 MB, 8 MB, 16 MB, 32 MB, 64 MB, and 128 MB. The DRAM technology used in SIMMS was Fast Page Mode and Extended Data Out DRAM.
30-pin, Proprietary Apple 68-pin, and 72-pin SIMMs: Miguel Durán [CC BY-SA (https://creativecommons.org/licenses/by-sa/2.5)]
Dual Inline Memory
Module (DIMM)
DIMM is a memory stick with power and data contacts on both sides of the board. The DIMM is a newer design memory module with a 64-bit memory pathway. SDRAM comes in DIMM format with 168 pins, and DDR-DRAM comes in DIMM format with 184 pins. Variants of DIMM slots support DDR, DDR2, DDR3, DDR4 RAM modules.
Two types of DIMMs: a 168-pin SDRAM module (top) and a 184-pin DDR SDRAM module (bottom).: The original uploader was Grendelkhan at English Wikipedia. [CC BY-SA (http://creativecommons.org/licenses/by-sa/3.0/)]
Rambus Inline Memory Module (RIMM)
The RIMM is the packaging style used for Rambus DRAM. It is very similar to a DIMM but uses different pin settings. The word RIMM is actually a trademark of Rambus and used to refer to a module using Rambus technology.
RDRAM memory with integrated heat spreader: User Kotepho on en.wikipedia [Public domain]
How to Install Various MemoryPackaging
This section discusses installing memory specifically the
different types of memory packaging. It also covers the problems you are most
likely to encounter and how to avoid them.
When you install or remove the memory, you are most likely to encounter the following problems:
Electrostatic discharge
Improperly seated modules
Incorrect memory configuration settings in the BIOS Setup
To prevent electrostatic discharge (ESD) when you install sensitive memory chips or boards, follow the set procedures and precautions. Remove any static charge you are carrying by touching the system chassis before you begin, or better yet, wear a good commercial grounding strap on your wrist. Avoid wearing synthetic-fiber clothing or leather-soled shoes because these promote the generation of static charges.
Each memory packaging must be installed in a specific orientation. Interference fit notches and tangs are designed to prevent the improper installation of the module into the socket. As long as you are observant and don’t try to force anything, the proper orientation should be fairly easy to figure out. When inserting the module, be sure the notches align with the appropriate tangs on the socket.
Power of Your Computer
Remember even before opening the system chassis, be sure
the system power is off! The best way is to remove the power cord that goes to
the power supply unit.
You remove SIMMs, DIMMs, or RIMMs by releasing the locking
tabs and either pulling or rolling them out of their sockets. The installation
is exactly the opposite. After adding the memory and powering the system, you
might have to run the BIOS Setup and save the new amount of memory installed. Newer
systems automatically detect the new amount of memory and reconfigure the BIOS
Setup settings for you.
Installing SIMMs
SIMM memory is oriented by a notch on one side of the
module that is not present on the other side. The socket has a protrusion that
must fit into this notched area on one side of the module. This protrusion
makes installing a SIMM backward impossible unless you break the connector or
the module. Align notch(es) with corresponding key(s) in the memory slot,
insert the SIMM at 60 degrees into the motherboard, tilt the SIMM into the
socket until it is near 90 degrees and the metal clips lock into place.
Installing a SIMM Module: https://images.slideplayer.com/11/3325872/slides/slide_11.jpg
How to InstallDIMMs and RIMMs
Installing a DIMM: https://docs.oracle.com/cd/E19127-01/ultra27.ws/820-6776/z40001fc1036605/index.html
DIMMs and RIMMs are keyed by notches along the bottom connector edge that are offset from the center so they can be inserted in only one direction. They are inserted at an angle of ninety degrees. Open up the ejector tabs locks and insert the memory module. Once the socket protrusion aligns with the notched area, gently push downwards from both sides until the ejector tabs lock into place.
This is a guide on how to reset the IFMIS password. The National Treasury rolled out the Integrated Financial Management Information System (IFMIS) throughout the country. It is an electronic procurement system (e-procurement). Its main aim is to serve Kenyans effectively on issues relating to public procurement. Often, people forget their passwords especially when you have not logged in for a while.
You do not have to miss a tender just because of a forgotten IFMIS password. This article assumes you have already registered for IFMIS as a supplier. In case you have not yet registered, this guide will help you to register and even submit your tender documents.
Below the user name and password, locate the login assistance and click on it.
On the login assistance page that opens, type your user name which is usually the email you used to register with.
Click the ‘forgot password’ button.
Open your email to check the password reset instructions.
Check an email from ‘workflow Mailer’ and open it.
Click on the ‘reset your password’ link.
Enter the new password you wish to use.
Resetting IFMIS Password
That is the simple process to follow when you want to reset the IFMIS password. Remember to use a strong password with at least eight characters. This should be a combination of text and numbers and you might also throw some special characters in the mix. A hard to guess password is good as it secures your account. It is not advisable to use common names as they easy to guess. However, if you insert special characters in between, it can turn them to a secure password. When logging in remember that the user name is the email you used when registering your account.
Computer memory is a physical device capable of storing information temporarily for instance like RAM or permanently like in ROM. Memory is used to store data and instructions being worked on. There are two types of computer memory – Primary Memory (RAM and ROM) and Secondary Memory (Hard disk drive, SSD, CD, USB Flash Drive, etc.)
Computer Memory – Front and back of HyperX DDR3 RAM memory modules, By: Mr. Yukio [CC BY-SA (https://creativecommons.org/licenses/by-sa/4.0)]
There Are Two Main
Types of Primary Memory Used In Computers
RAM – Random Access Memory
ROM – Read-Only Memory
Random Access Memory
(RAM)
This is a temporary storage area where the programs and data required by the processormust reside. Memory storage is considered temporary because the data and programs remain there only as long as the computer has electrical power or is not rebooted. Before being shut down or restarted, any data that has been changed should be saved to a more permanent storage device (usually a hard disk drive) so it can be reloaded into memory in the future.
The Main memory is called RAM because you can randomly access any location in memory. This as opposed to sequential access where data is accessed in a predetermined ordered sequence. However, note that Read-Only Memory (ROM) is also randomly accessible. It is usually differentiated from the system RAM because it maintains data without power and can’t normally be written to.
Computer Memory
There Are Two
Different Types of RAM
DRAM (Dynamic Random Access Memory) and
SRAM (Static Random Access Memory)
Dynamic Random Access
Memory (DRAM)
Dynamic RAM (DRAM) is the type of memory chip used for
most of the main memory in modern personal computers. The main advantage of Dynamic
RAM is that it is very dense; hence a lot of bits can be packed into a very
small chip. It is also inexpensive, which makes purchasing large amounts of
memory affordable.
The memory cells in a DRAM chip are tiny capacitors that retain a charge to indicate a bit. A binary digit is either a zero or a one (absence or presence of a charge). The problem with DRAM is that it is dynamic. And because of the design, it must be constantly refreshed; otherwise, the electrical charges in the individual memory capacitors will drain and the data will be lost. Refresh occurs when the system memory controller takes a tiny break and accesses all the rows of data in the memory chips. Most systems have a memory controller (normally built into the North Bridge portion of the motherboard chipset).
Types of Dynamic
Random Access Memory (DRAM)
Fast Page Mode DRAM – FPM DRAM
Extended Data Out DRAM – EDO DRAM
Burst Extended Data Out DRAM – BEDO DRAM
Synchronous DRAM – SDRAM
Double Data Rate SDRAM – DDR SDRAM
Double Data Rate 2 SDRAM – DDR2 SDRAM
Rambus DRAM – RDRAM
Static Random Access
Memory (SRAM)
This is another distinct type of memory that is significantly faster than most types of DRAM. Static RAM does not need periodic refresh rates like DRAM. Because of how SRAMs are designed, they are much faster than DRAM and much more capable of keeping pace with modern processors.
SRAM cell is designed using six transistors. This represents
each bit of storage. The use of transistors but no capacitors means that
refresh rates are not necessary because there are no capacitors to lose their
charges over time. As long as there is power, SRAM remembers what is stored.
Types of SRAM
Async SRAM
Sync SRAM
Pipeline Burst SRAM
Static Ram chip from a NES clone. 2K X 8 bit, Source: Satyamfifa [Public domain]
Read-Only Memory (ROM)
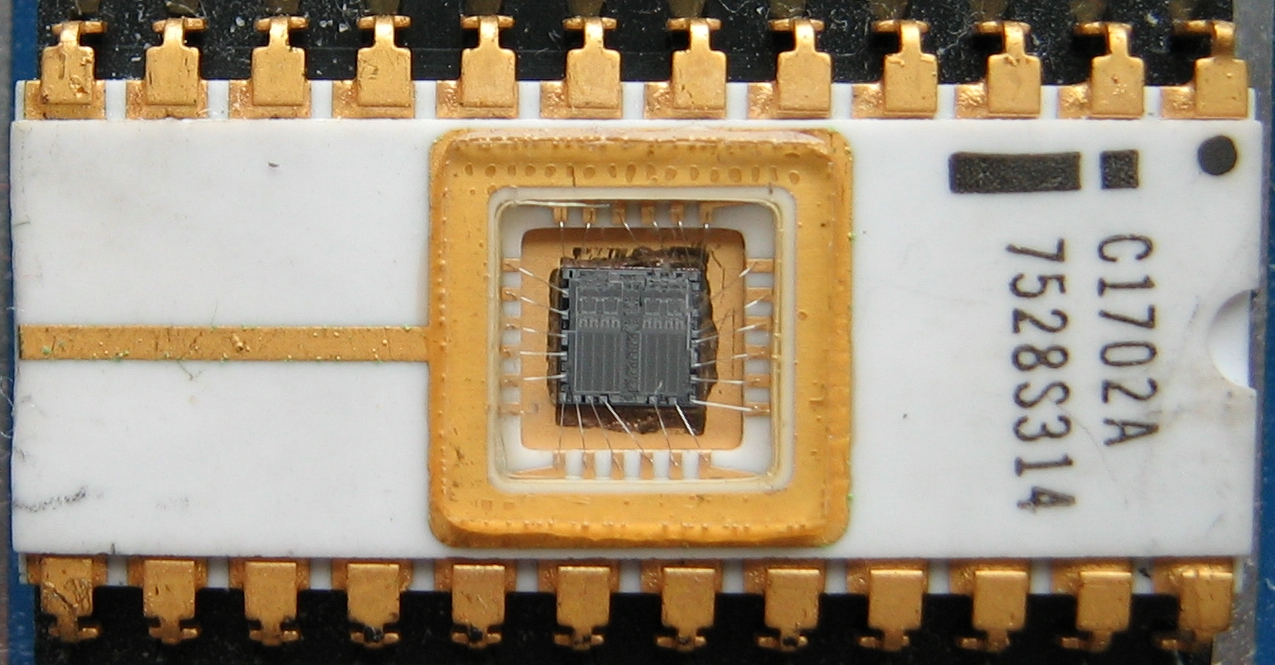
ROM is a type of computer memory that can permanently or semi-permanently store data. It is called read-only because it is either impossible or difficult to write to as opposed to RAM. Read-Only Memory is a non-volatile memory because any data stored in it remains there, even if the power is turned off. Thus, ROM is an ideal place to put the personal computers startup instructions. This is the software that boots the computer system. ROM is mostly used for firmware updates and it is found in computers and other electronic devices.
EPROM : The first INTEL EPROM, the 1702 (1971), Author: Poil 01:10, 17 Apr 2005 (UTC) [CC BY-SA (http://creativecommons.org/licenses/by-sa/3.0/)]
ROM Chip Types
The four main types of ROM chips that have been used in
PCs are as follows:
ROM – Read-Only Memory
PROM – Programmable ROM
EPROM – Erasable PROM
EEPROM – Electrically Erasable PROM, also sometimes called a flash ROM
These are the procedures you need to follow to deregister a business name on the eCitizen portal. This process is also known as business cessation.
You apply for a cessation to close when you are no longer able to run your business. It is important to state legally that you will no longer be doing business under the given name.
You can deregister a business name anytime upon completion of business or partnership term or upon the death of a partner, withdrawal of a partner or for any other reason which make it impossible to carry on the business.
Requirements In Order
To Deregister a Business Name
A scan of the Business Registration Certificate
A scan of signed BN6 form
How to Deregister a Business Name
Step by Step Guide on How to Deregister a Business Name
Log into your eCitizen account using your ID Number/Email and password.
Locate the Business Registration Service option and click on it.
You will see the business you want to deregister listed under ‘My businesses” option.
On the right hand side, click on view button.
Click on the ‘Maintain a Company’ option.
Click on the ‘Make Application” button and select cessation to close.
Select a reason for cessation and upload the business registration certificate. Click on save and continue.
On the next stage, download and sign the BN6 form then upload it using the provided option. Click on save and continue button to proceed.
A one-time code will be sent to your registered phone. Enter the code and click on verify.
Review your application details; confirm that you have provided the required information and click finish. Make your payment (Kshs 250) and submit your application.
Business Cessation
How to Check If the
Business Has Been Deregistered
Once you deregister a business name, the process will take a few days to go through. To check if the business cessation has been completed, log into your eCitizen account and click on the business option.
Under my businesses, you will see the status reading ceased on the said business. To download and print notice of approval of business cessation, click on view. On the recent applications click on view and a page where you can download it will open.
Conclussion of Business Sessation
It is always important to follow the laid out procedures of closing any business you are not using. Not, only businesses, even other entities such as bank accounts you no longer use, should be closed officially. This will prevent many problems from arising soon.
Thanks for reading and remember to check more of my works.