Memory is made from tiny semiconductor chips that are then packaged in a less fragile way to enable them to be integrated into a computer system. The chip packages are more often integrated into larger packages. Computer memory is therefore available in various physical packaging. This article discusses the various memory packaging that has been used in the computer world.
The Major Types of Memory Packaging Include the Following
Single Inline Pin Package (SIPP)
This is an obsolete type of memory module with a single row of (actual) pins along one side. SIPP was made of a printed circuit board where a number of memory chips were mounted. It had 30 protruding pins along one edge which were inserted into matching holes on the motherboard. This memory packaging was used for a while before SIMM technology replaced it.

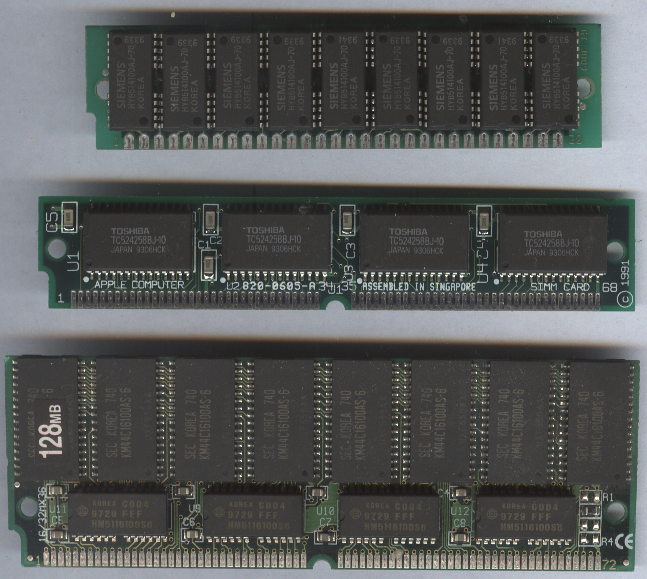
Single Inline Memory Module (SIMM)
This is a type of memory module containing Random Access Memory and it was used in the early days of the personal computer. Single Inline Memory Module is now an obsolete type of memory stick. It contained power and data contacts on one side of the board. The pins on the other side were redundant. SIMMs comes in two sizes, 30-pin, and 72-pin. The 30-pin SIMMs usually came with small amounts of memory.
The standard size was 256 KB, 1 MB, 4 MB, 8 MB, and 16MB. The 72-pin SIMM came in standard sizes of 1 MB, 2 MB, 8 MB, 16 MB, 32 MB, 64 MB, and 128 MB. The DRAM technology used in SIMMS was Fast Page Mode and Extended Data Out DRAM.
Dual Inline Memory Module (DIMM)
DIMM is a memory stick with power and data contacts on both sides of the board. The DIMM is a newer design memory module with a 64-bit memory pathway. SDRAM comes in DIMM format with 168 pins, and DDR-DRAM comes in DIMM format with 184 pins. Variants of DIMM slots support DDR, DDR2, DDR3, DDR4 RAM modules.

Rambus Inline Memory Module (RIMM)
The RIMM is the packaging style used for Rambus DRAM. It is very similar to a DIMM but uses different pin settings. The word RIMM is actually a trademark of Rambus and used to refer to a module using Rambus technology.

How to Install Various Memory Packaging
This section discusses installing memory specifically the different types of memory packaging. It also covers the problems you are most likely to encounter and how to avoid them.
When you install or remove the memory, you are most likely to encounter the following problems:
- Electrostatic discharge
- Improperly seated modules
- Incorrect memory configuration settings in the BIOS Setup
To prevent electrostatic discharge (ESD) when you install sensitive memory chips or boards, follow the set procedures and precautions. Remove any static charge you are carrying by touching the system chassis before you begin, or better yet, wear a good commercial grounding strap on your wrist. Avoid wearing synthetic-fiber clothing or leather-soled shoes because these promote the generation of static charges.
Each memory packaging must be installed in a specific orientation. Interference fit notches and tangs are designed to prevent the improper installation of the module into the socket. As long as you are observant and don’t try to force anything, the proper orientation should be fairly easy to figure out. When inserting the module, be sure the notches align with the appropriate tangs on the socket.
Power of Your Computer
Remember even before opening the system chassis, be sure the system power is off! The best way is to remove the power cord that goes to the power supply unit.
You remove SIMMs, DIMMs, or RIMMs by releasing the locking tabs and either pulling or rolling them out of their sockets. The installation is exactly the opposite. After adding the memory and powering the system, you might have to run the BIOS Setup and save the new amount of memory installed. Newer systems automatically detect the new amount of memory and reconfigure the BIOS Setup settings for you.
Installing SIMMs
SIMM memory is oriented by a notch on one side of the module that is not present on the other side. The socket has a protrusion that must fit into this notched area on one side of the module. This protrusion makes installing a SIMM backward impossible unless you break the connector or the module. Align notch(es) with corresponding key(s) in the memory slot, insert the SIMM at 60 degrees into the motherboard, tilt the SIMM into the socket until it is near 90 degrees and the metal clips lock into place.

How to Install DIMMs and RIMMs

DIMMs and RIMMs are keyed by notches along the bottom connector edge that are offset from the center so they can be inserted in only one direction. They are inserted at an angle of ninety degrees. Open up the ejector tabs locks and insert the memory module. Once the socket protrusion aligns with the notched area, gently push downwards from both sides until the ejector tabs lock into place.

Thanks for sharing. I read many of your blog posts, cool, your blog is very good. https://www.binance.info/cs/join?ref=IJFGOAID